Monday, 24 September 2012

Growing Apple Trees From Seeds

For us here in the northern hemisphere it's Autumn. A time of harvest, except there isn't much to harvest, at least not apples. There have always been poor years, but we seem to be seeing a very definite change to our seasonal weather patterns. This spring was alternately cold and wet, when the insects did not fly to pollinate the blossom,  then very hot days with frost at night; equally bad for setting fruit.

Doom, Doom! 

No! Lets see what we can do about it. I grow apple trees from seeds, to produce new varieties. These get planted out here and there to fend for themselves (I am getting good useable apples). The interesting observation this year is many of my seedlings are bearing fruit where the 'named varieties' are not. We are seeing the need for new varieties adapted to our varying climatic conditions.

So plant apple pips. When they are big enough plant the trees out (where ever you can) and let them get on with it.

If you are interested, I've just put this idea, in more detail, on Kindle and will make it free download as often as possible.

 'I invoke the Welsh legend of Cantre'r Gwaelod, a land long since drowned beneath the Irish sea, to help me communicate my passion for apple growing. Assisted by glimpses into a mythological past we are enabled to see into a potential future and the need to produce new varieties of apple. More importantly the need for us all to do this, not leaving it in the hands of faceless 'experts'. After the inspiration comes the simple 'How To' explanations allowing us all to participate in the apple crops of the future by growing apple trees from seeds today.'

Lost Orchards of Cantre'r Gwaelod


http://www.amazon.co.uk/Orchards-Cantrer-Gwaelod-Booklet-ebook/dp/B009FLFWZI/ref=sr_1_1?ie=UTF8&qid=1348480210&sr=8-1


Enjoy!

Monday, 20 August 2012

Pink Fir Apple potatoes from a new raised bed

This raised bed was one that took some filling, it was the last in the flight and at the bottom. There seemed to be nothing to fill it with when I levelled the path. So over a couple of years it received all the clumps of weeds, spent potting compost, turf etc. Then last year I hacked the weeds down covered it in a bit of black poly and left it until spring. My thoughts were to clean it up this season and so planted some pink fir apple potatoes in it as they are strong growing and make a good weed suppressing canopy. If you don't know them they are an old (Victorian I think) variety which are nearly as knobbly as a Jerusalem Artichoke, but have the most delightful 'new potato' flavour, which they keep even in storage.

Pink-fir-apple

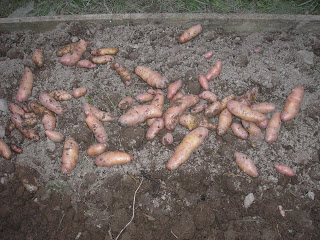
As seen in this picture they tend to be long and thin rather than the more usual potato shape of round - oval.
What interested me is how productive this bed has proved to be. No compost was added, just the odds and ends I mentioned above. Furthermore it's produced a very good loamy soil, nicely opened up by digging the potatoes.

Pink-fir-apples

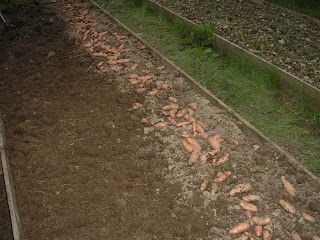
These spuds had to be dug as they had gone down with the blight (one of the drawbacks of Pink Fir Apple), but even so produced a decent crop.The picture shows the crop from half the bed, the total crop will be enough to satisfy our craving for 'new potatoes' through the winter months.

Tuesday, 14 August 2012

How to assemble a Barn Cloche

I have noticed increased hits on the pages where I talk about cloches. On following up a few leads I find there is a lack of information about what is needed for a barn cloche and how to assemble them. Autumn is coming and we'll be needing them soon, so here it is.
barn cloche wires
The metalwork

This image shows the metalwork needed for a barn cloche. From top to bottom, the main frame to support the glass sides, two hooks to support the glass roof and a spring to hold it all in place. Four pieces of glass are required, normally about 1 foot x 2 feet (300 x 600mm)


barn cloche
How the glass sides fit

The glass sides sit in the hooks of the main frame. There is a deliberate mistake in this photo:-


barn cloche
First thread the spring onto the leg of the main frame
Put the spring over a leg of the main frame first. If you don't do this you get all the glass in place and no way to hold it there!
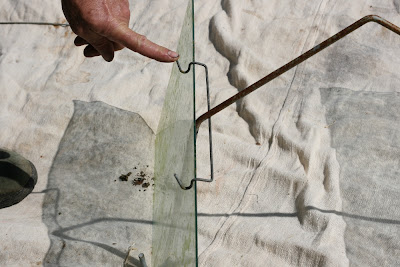


barn cloche
Clip goes under main frame and hooks over side glass.
Depending on how springy these clips are they may or may not stay in place by themselves. If not just hold them there whilst the first roof glass is put in place.

barn cloche
The clip goes BEHIND the main frame bar
The usual mistake in assembling Barn Cloches for the first time is getting the spring in the right place. It goes behind, i.e. on the inside of the main frame at the point of the bend and is hooked ofer the top of the side glass.

barn cloche
Place first roof glass in hooks of clip
The first roof glass rests in the hooks of the clip and on the top part of the main frame.

barn cloche
Lift the spring to the top of the frame
Now comes the awkward bit. Lift the spring to the top of the cloche and lift the first roof glass so that when the clips of the spring are over its edge the spring is upright. The glass will NOT be resting on the main frame. You will notice the second roof glass is resting in the hooks of the other side clip ready to be lowered into its final position.

barn cloche
Adding second roof glass
The second roof glass is then carefully slipped under the other side of the spring.
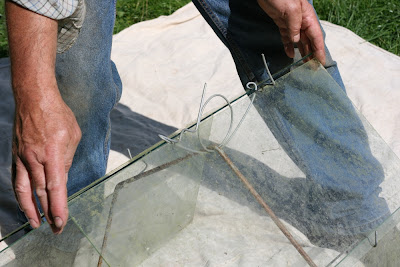
barn cloche
True up ends of glass
Once all is in place you can carefully true up the ends of the cloche, by sliding them, so that they are square and thus less likely to to be chipped when setting up in a row of cloches.
barn cloche
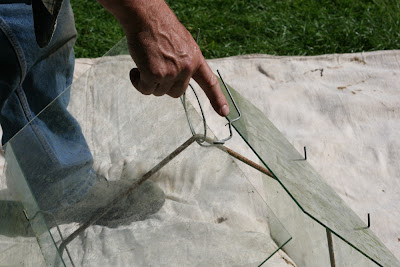
Gap for ventilation
The way these springs are made allow for two positions closed (as shown in first assembly) and open for ventilation shown here.
barn cloche
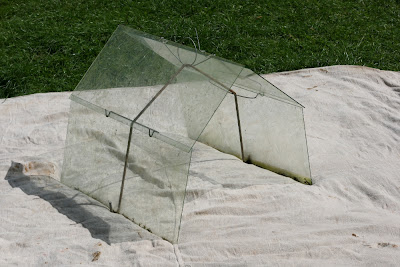
The fully assembled cloche
That's it. The cloche is ready for use. Normally the glass would be cleaned first, but using dirty glass made it easier to photograph [ That's my excuse :) ] Also, if you are lucky enough to have an old cloche set, there may be a mysterious triangular wire. This is to allow the removal of one roof glass to allow watering, weeding etc, with out the cloche falling apart. I'll photograph that another day if anyone is interested leave a comment.

Finally a safety warning. Be careful handling glass, wear gloves (I know I didn't) glass can shatter unexpectedly, especially old glass that has been stressed by multiple uses. If you are cutting new glass for cloches then take the time to smooth all the edges with emery cloth or similar. It takes time, but it saves so many cut fingers. Cut glass stays sharp for years and you will hopefully be using these cloches for years.

Well I hope that the above proves useful.

Wednesday, 1 August 2012

DIY Potato Lifting Plough

It's just turned wet here again, but I'm feeling smug. Last week the potatoes were going down with blight, what's so good about that you may ask. This is the first year that we've grown a field scale patch. That sounds like large scale, but really it was tiny by commercial standards, just too big for me to dig by hand. Of course, you've guessed it, I hadn't bought or made the device with which to lift them. So after a couple long days with a pile of scrap metal, a welder and a sore back, I finally produced the 'Glangwili Potato Plough'. Basically it's a two furrow (un)ridging plough with metal bars instead of mouldboards. It works by the point running under the root, breaking the ridge open then lifting the potatoes to the surface. It worked well and the spuds were up and in the barn the day before the rain set in. That's why I'm feeling smug, isn't it great when it works out like that. However, I'm going to make the most of it, it doesn't happen often.

Monday, 23 July 2012

In praise of the wild corners.

Once again I return after such a long break. You may notice the change to the tag line in the title, 'Organic' has disappeared. That is because we have let our organic certification lapse. However that does not mean we are doing anything different, it just saves time and money!

Meadowsweet - A native perennial
So on to the subject matter. In praise of the wild corners. What was once called 'The Wasteland', and still is by some. We have a lot of wild corners here, in fact it is more accurate to say that we have some cultivated corners. This morning is sunny and fine, if a little windy, and we've collected both Mint and Meadowsweet for drying. Both of these are growing in wild corners, untended and zero input; a gift from nature.
Mint - an escapee gone feral
 The Meadowsweet is a native whilst the Mint is an escapee from the herb garden. The interesting thing is the mint is doing better in the location in which it chose to grow than where I planted it in the herb garden.

Drying mint for mint tea


 To dry the mint we tie it in sprigs of two stems and simply hang it up in the kitchen. If it is hung in larger bunches it can have a tendency to go mouldy, especially in our damp climate.

The Meadowsweet is dried on racks over a tray, as some of the tiny petals tend to drop off as it dries and cause mini snow drifts otherwise.
Meadowsweet drying


Once completely dry we store these in glass jars which will keep the herbs useable for a long time. Last year was bad and we are still using meadow sweet collected in the summer of 2010.
The main uses we have are to make teas. Mint is just a nice drink and so is the meadow sweet. The medowsweet also, allegedly, has anti-inflammatory properties and that is what we tend to use it for.