I have noticed increased hits on the pages where I talk about cloches. On following up a few leads I find there is a lack of information about what is needed for a barn cloche and how to assemble them. Autumn is coming and we'll be needing them soon, so here it is.
 |
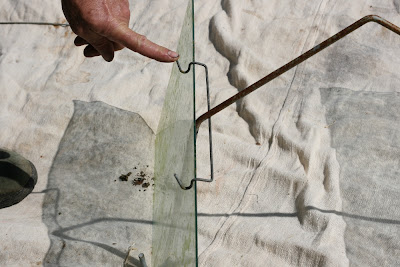
| The metalwork |
|
|
This image shows the metalwork needed for a barn cloche. From top to bottom, the main frame to support the glass sides, two hooks to support the glass roof and a spring to hold it all in place. Four pieces of glass are required, normally about 1 foot x 2 feet (300 x 600mm)
 |
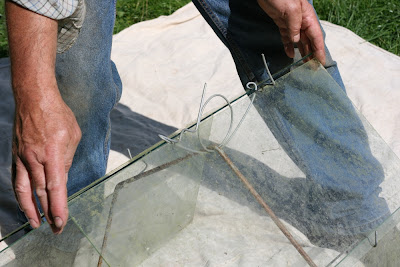
| How the glass sides fit |
|
|
The glass sides sit in the hooks of the main frame. There is a deliberate mistake in this photo:-
 |
| First thread the spring onto the leg of the main frame |
Put the spring over a leg of the main frame first. If you don't do this you get all the glass in place and no way to hold it there!
 |
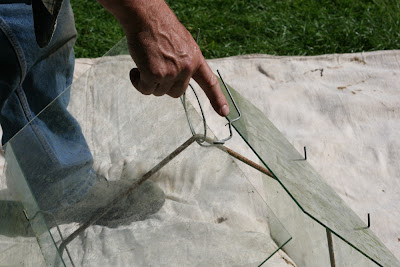
| Clip goes under main frame and hooks over side glass. |
|
Depending on how springy these clips are they may or may not stay in place by themselves. If not just hold them there whilst the first roof glass is put in place.
 |
| The clip goes BEHIND the main frame bar |
The usual mistake in assembling Barn Cloches for the first time is getting the spring in the right place. It goes behind, i.e. on the inside of the main frame at the point of the bend and is hooked ofer the top of the side glass.
 |
| Place first roof glass in hooks of clip |
The first roof glass rests in the hooks of the clip and on the top part of the main frame.
 |
| Lift the spring to the top of the frame |
Now comes the awkward bit. Lift the spring to the top of the cloche and lift the first roof glass so that when the clips of the spring are over its edge the spring is upright. The glass will NOT be resting on the main frame. You will notice the second roof glass is resting in the hooks of the other side clip ready to be lowered into its final position.
 |
| Adding second roof glass |
The second roof glass is then carefully slipped under the other side of the spring.
 |
| True up ends of glass |
Once all is in place you can carefully true up the ends of the cloche, by sliding them, so that they are square and thus less likely to to be chipped when setting up in a row of cloches.
 |
| Gap for ventilation |
The way these springs are made allow for two positions closed (as shown in first assembly) and open for ventilation shown here.
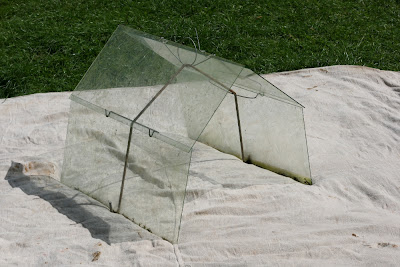 |
| The fully assembled cloche |
That's it. The cloche is ready for use. Normally the glass would be cleaned first, but using dirty glass made it easier to photograph [ That's my excuse :) ] Also, if you are lucky enough to have an old cloche set, there may be a mysterious triangular wire. This is to allow the removal of one roof glass to allow watering, weeding etc, with out the cloche falling apart. I'll photograph that another day if anyone is interested leave a comment.
Finally a safety warning. Be careful handling glass, wear gloves (I know I didn't) glass can shatter unexpectedly, especially old glass that has been stressed by multiple uses. If you are cutting new glass for cloches then take the time to smooth all the edges with emery cloth or similar. It takes time, but it saves so many cut fingers. Cut glass stays sharp for years and you will hopefully be using these cloches for years.
Well I hope that the above proves useful.


Looks great Richard, just wish I could source the metalwork,
ReplyDeleteHi Fidelis, Yes that was my problem too. If you've not already seen it look at my second ever post, back in 2009, where I was making the metalwork. Bit extreme, but I really wanted to work with barn cloches. I would say it's been worth it too.
DeleteAt last an item on wire cloches. i have loads of glass i wish to use as such.(plastic is over-priced)Will you sell me a set of wires?
ReplyDeleteHi Charly,
ReplyDeleteSorry but I'm not really set up for manufacture, but if you get some hard drawn fencing wire they are not that difficult to make. The other possibility is look at boot sales, ebay and the like where they do crop up from time to time. You could even talk to the local blacksmith as someone could do well making these wires commercially if they are set up to do 'proper' metalwork. Anyway best of luck with your search.
I used these years ago and completely forgot how they are made...So, I did a search on tintanet and there you were with just the very thing to remind me of the wires. I can vouch for the fact that given a little dexterity they are not hard to make and also the end resulting cloches are brilliant and effective. Thanks so much for taking the time to post this plan and putting me back on track. Cheers Ian
ReplyDeleteGREAT ! I've got about 25 Chase Barn cloche sets , complete with glass , and have been struggling to work out how to assemble them !!
ReplyDeleteYour article with pictures is just what I need . Thanks !
Fantastic. Thank uou so much. I saw this exact setup in John Seymours book "Self Sufficient Life and how to live it" and I couldnt understand what the strange looking wires did... so I searched on Google... and Begorra! there it is all laid out on your blog. THANKS,
ReplyDeleteThis response might be a bit late in the day (!), but if you Google Hibbit, you will find a company that appear to sell Chase cloches, albeit at £15 a time sans glass. I had never thought of making my own, but having read this, I might give it a try. Wire is cheap!
ReplyDeleteHi, I recently added to my cloches by buying a joblot of 2nd hand. I got some bits that I don't know how to use, and wonder if anyone here might? One sort is H shaped. One side of the 'upright' is plain bar, the other is a 'hook with clips'. The 'crossbar' is approx 12". The other bits are about 5" overall with both ends being curled over like old bedsprings. In the centre they are twisted to form a small 'eye', of maybe 3 or 4mm diameter.
ReplyDeleteThanks for the tutorial, I am reading a copy of Cloche Gardening written by J L H Chase, son of the original designer of this cloche system. I think I will try toake a set myself.
ReplyDelete